Overview
This guide details the necessary steps to establish SSO for PurelyHR using BeanLogin.
The guide assumes that you already have an existing PurelyHR Business subscription.
SSO Configuration in BeanLogin
| Create As Password-Vault App | Create As SAML App | User Provisioning Supported |
| Supported | Supported | Supported |
Below are the steps involved in configuration of SSO for Dropbox within BeanLogin
- Login to BeanLogin as an Administrator.
- Navigate to Administration >> Access Management >> Corporate Apps.
- Click New.
- Select PurelyHR from the list of apps and click it will give option whether to add as password-vault/SAML based on choice select the proper option and click on Add Selected Apps. It will add apps under corporate section with status as inactive.
- Click PurelyHR app from Corporate Apps section and open in edit mode and enter your domain name.
- Click Download Metadata File button and keep that file with you.
- PurelyHR support Just In Time Provisioning, so you need to enable that in Purely HR account side and just set flag to BeanLogin to understand its enabled or not.
- Submit.
SSO Configuration in PurelyHR
-
- Sign in to your organization’s PurelyHR administrator account.
- Go to your Account Dashboard.
- Click on SSO Settings.

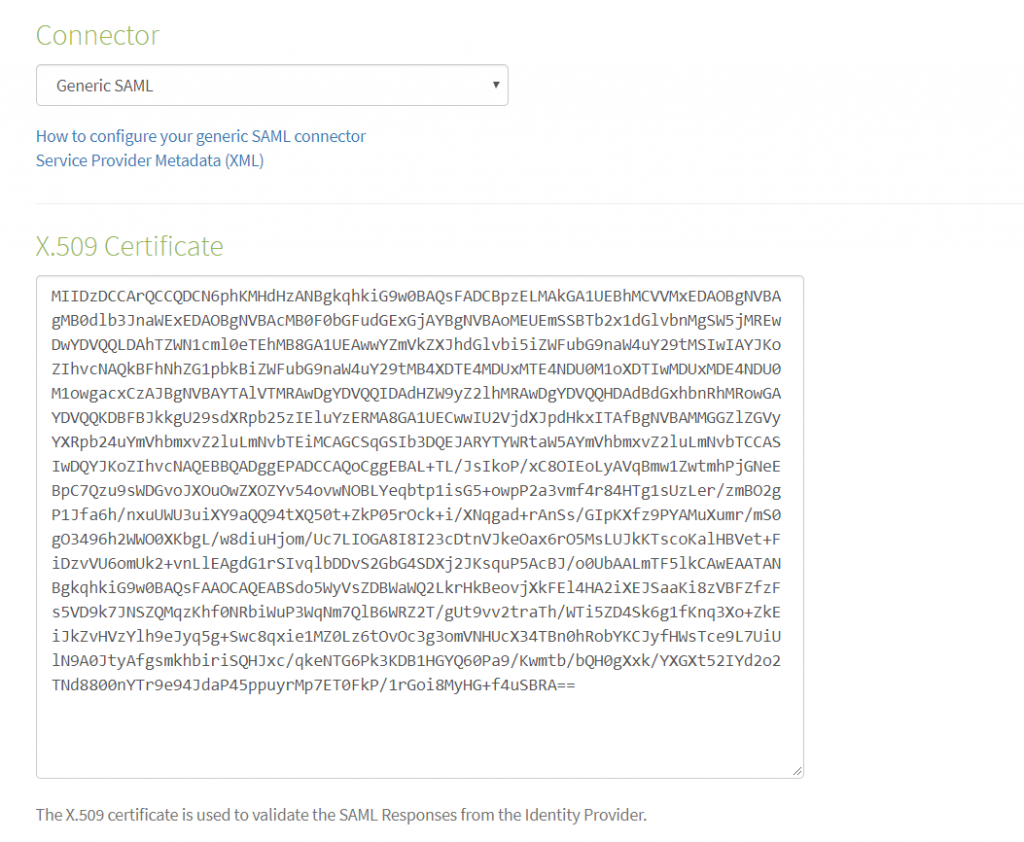
- Select Connector as Generic SAML.
- In the x.509 Certificate field, upload a .pem version of the cert below. You may use any tool like OpenSSL to convert the below .cer file to .pem format. MIIDzDCCArQCCQDCN6phKMHdHzANBgkqhkiG9w0BAQsFADCBpzELMAkGA1UEBhMCVVMxEDAOBgNVBAgMB0dlb3JnaWExEDAOBgNVBAcMB0F0bGFudGExGjAYBgNVBAoMEUEmSSBTb2x1dGlvbnMgSW5jMREwDwYDVQQLDAhTZWN1cml0eTEhMB8GA1UEAwwYZmVkZXJhdGlvbi5iZWFubG9naW4uY29tMSIwIAYJKoZIhvcNAQkBFhNhZG1pbkBiZWFubG9naW4uY29tMB4XDTE4MDUxMTE4NDU0M1oXDTIwMDUxMDE4NDU0M1owgacxCzAJBgNVBAYTAlVTMRAwDgYDVQQIDAdHZW9yZ2lhMRAwDgYDVQQHDAdBdGxhbnRhMRowGAYDVQQKDBFBJkkgU29sdXRpb25zIEluYzERMA8GA1UECwwIU2VjdXJpdHkxITAfBgNVBAMMGGZlZGVyYXRpb24uYmVhbmxvZ2luLmNvbTEiMCAGCSqGSIb3DQEJARYTYWRtaW5AYmVhbmxvZ2luLmNvbTCCASIwDQYJKoZIhvcNAQEBBQADggEPADCCAQoCggEBAL+TL/JsIkoP/xC8OIEoLyAVqBmw1ZwtmhPjGNeEBpC7Qzu9sWDGvoJXOuOwZXOZYv54ovwNOBLYeqbtp1isG5+owpP2a3vmf4r84HTg1sUzLer/zmBO2gP1Jfa6h/nxuUWU3uiXY9aQQ94tXQ50t+ZkP05rOck+i/XNqgad+rAnSs/GIpKXfz9PYAMuXumr/mS0gO3496h2WWO0XKbgL/w8diuHjom/Uc7LIOGA8I8I23cDtnVJkeOax6rO5MsLUJkKTscoKalHBVet+FiDzvVU6omUk2+vnLlEAgdG1rSIvqlbDDvS2GbG4SDXj2JKsquP5AcBJ/o0UbAALmTF5lkCAwEAATANBgkqhkiG9w0BAQsFAAOCAQEABSdo5WyVsZDBWaWQ2LkrHkBeovjXkFEl4HA2iXEJSaaKi8zVBFZfzFs5VD9k7JNSZQMqzKhf0NRbiWuP3WqNm7QlB6WRZ2T/gUt9vv2traTh/WTi5ZD4Sk6g1fKnq3Xo+ZkEiJkZvHVzYlh9eJyq5g+Swc8qxie1MZ0Lz6tOvOc3g3omVNHUcX34TBn0hRobYKCJyfHWsTce9L7UiUlN9A0JtyAfgsmkhbiriSQHJxc/qkeNTG6Pk3KDB1HGYQ60Pa9/Kwmtb/bQH0gXxk/YXGXt52IYd2o2TNd8800nYTr9e94JdaP45ppuyrMp7ET0FkP/1rGoi8MyHG+f4uSBRA==
- In IDP issuer text box paste: urn:federation:beanlogin:yourdomain.purelyhr.com
- Add IDP Endpoint URL as: https://host_name/Federation/SAML2SSO.aspx?idpid=yourdomain.purelyhr.com, here host name is the current BeanLogin host URL
- Checked the Force SSO checkbox.
- checked the Auto-Create Users checkbox, If you want to auto create users When a user attempts to login to PurelyHR through the generic SAML connector.
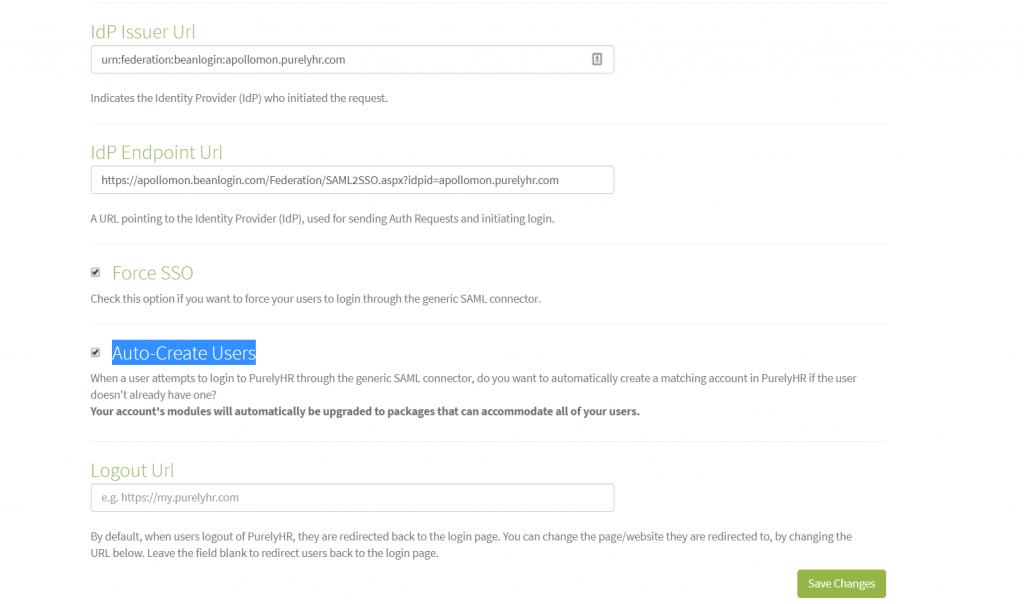
- Click Save Changes.
Provisioning Configuration in BeanLogin
You can enable the provisioning from the two places
- From Corporate App Edit where you have last step as Provisioning.
- From Identity Management -> Endpoint Provisioning Section.
Purely HR Supports the Just in Time Provisioning. If SSO is enabled and and you are setting JIT flag true on Purely HR side you are done.