Overview
This guide details the necessary steps to establish SSO for Slack Enterprise using BeanLogin.
The guide assumes that you already have an existing Slack Team Plus subscription.
SSO Configuration in BeanLogin
Below are the steps involved in configuration of Slack Team Plus for SSO within BeanLogin
| Create As Password-Vault App | Create As SAML App | User Provisioning Supported |
| Supported | Supported | Not Supported |
- Login to BeanLogin as an Administrator.
- Navigate to Administration >> Access Management >> Corporate Apps.
- Click New.
- Select Slack from the list of apps and click it will give option whether to add as password-vault/SAML based on choice select the proper option and click on Add Selected Apps. It will add apps under corporate section with status as inactive
- Enter the workspace name (eg. https://[workspacename].slack.com). Make note of the “Entity Id” value. This is required to enable SSO within Slack.
SSO Configuration in Slack
Pre-requisites
- Administrator credentials to your organization’s Slack Team Plus Workspace
Enable SSO
-
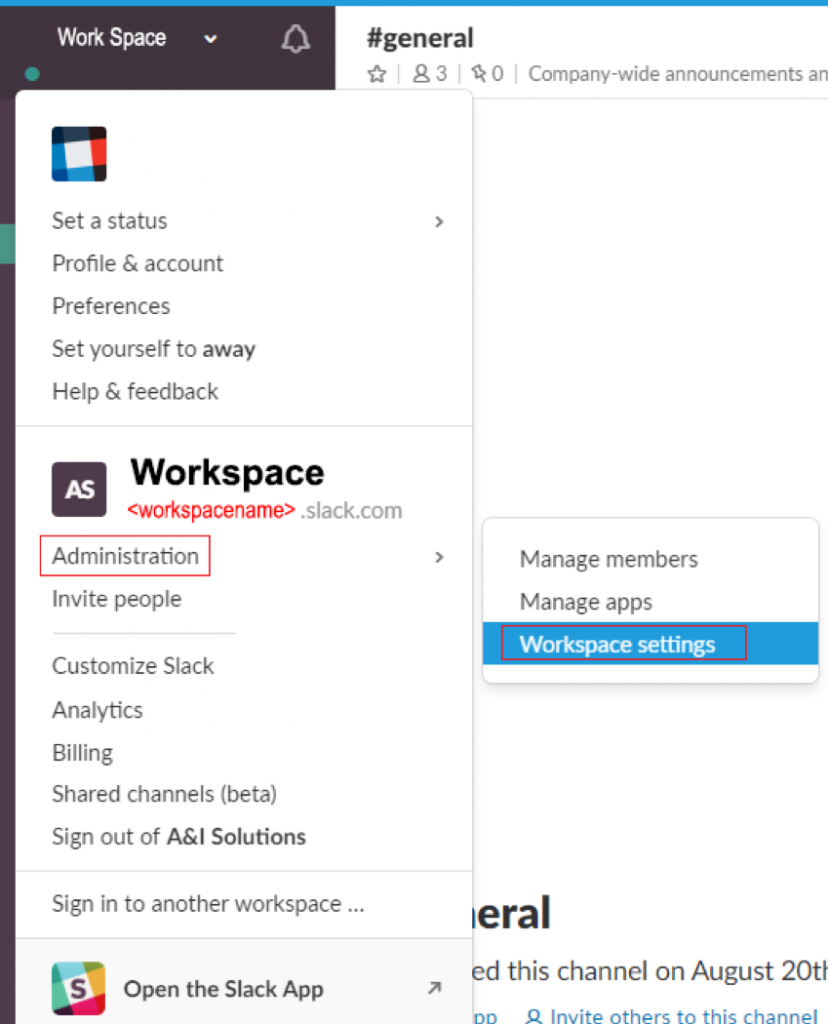
- Click the drop-down arrow next to your workspace name.
- Navigate to Administration à ‘Workspace settings’.

- Click ‘Authentication’ tab.
- In the SSO Configuration section, click Configure SSO.
- Enter the following SAML 2.0 Endpoint URL:
https://portal.beanlogin.com/Federation/SAML2SSO.aspx
-
- Enter the following in the Identity Provider Issuer URL:
urn:federation:beanlogin:https://[workspacename].slack.com
-
- Copy and paste the entire x.509 Certificate shown below in the Public Certificate:
MIIDzDCCArQCCQDCN6phKMHdHzANBgkqhkiG9w0BAQsFADCBpzELMAkGA1UEBhMCVVMxEDAOBgNVBAgMB0dlb3JnaWExEDAOBgNVBAcMB0F0bGFudGExGjAYBgNVBAoMEUEmSSBTb2x1dGlvbnMgSW5jMREwDwYDVQQLDAhTZWN1cml0eTEhMB8GA1UEAwwYZmVkZXJhdGlvbi5iZWFubG9naW4uY29tMSIwIAYJKoZIhvcNAQkBFhNhZG1pbkBiZWFubG9naW4uY29tMB4XDTE4MDUxMTE4NDU0M1oXDTIwMDUxMDE4NDU0M1owgacxCzAJBgNVBAYTAlVTMRAwDgYDVQQIDAdHZW9yZ2lhMRAwDgYDVQQHDAdBdGxhbnRhMRowGAYDVQQKDBFBJkkgU29sdXRpb25zIEluYzERMA8GA1UECwwIU2VjdXJpdHkxITAfBgNVBAMMGGZlZGVyYXRpb24uYmVhbmxvZ2luLmNvbTEiMCAGCSqGSIb3DQEJARYTYWRtaW5AYmVhbmxvZ2luLmNvbTCCASIwDQYJKoZIhvcNAQEBBQADggEPADCCAQoCggEBAL+TL/JsIkoP/xC8OIEoLyAVqBmw1ZwtmhPjGNeEBpC7Qzu9sWDGvoJXOuOwZXOZYv54ovwNOBLYeqbtp1isG5+owpP2a3vmf4r84HTg1sUzLer/zmBO2gP1Jfa6h/nxuUWU3uiXY9aQQ94tXQ50t+ZkP05rOck+i/XNqgad+rAnSs/GIpKXfz9PYAMuXumr/mS0gO3496h2WWO0XKbgL/w8diuHjom/Uc7LIOGA8I8I23cDtnVJkeOax6rO5MsLUJkKTscoKalHBVet+FiDzvVU6omUk2+vnLlEAgdG1rSIvqlbDDvS2GbG4SDXj2JKsquP5AcBJ/o0UbAALmTF5lkCAwEAATANBgkqhkiG9w0BAQsFAAOCAQEABSdo5WyVsZDBWaWQ2LkrHkBeovjXkFEl4HA2iXEJSaaKi8zVBFZfzFs5VD9k7JNSZQMqzKhf0NRbiWuP3WqNm7QlB6WRZ2T/gUt9vv2traTh/WTi5ZD4Sk6g1fKnq3Xo+ZkEiJkZvHVzYlh9eJyq5g+Swc8qxie1MZ0Lz6tOvOc3g3omVNHUcX34TBn0hRobYKCJyfHWsTce9L7UiUlN9A0JtyAfgsmkhbiriSQHJxc/qkeNTG6Pk3KDB1HGYQ60Pa9/Kwmtb/bQH0gXxk/YXGXt52IYd2o2TNd8800nYTr9e94JdaP45ppuyrMp7ET0FkP/1rGoi8MyHG+f4uSBRA==
-
- Under Advanced Options, click Expand.
- Enter the Service Provider Issuer URL:
https://[workspacename].slack.com
- Choose how SAML response from your IdP is signed. Uncheck the box “Responses Signed” and check the box “Assertion Signed”.

- Click Test Configuration.
- Click Turn on SSO.